Learn how to show hidden files in Windows 10….
I could have sworn that I saved these files in this folder! No Kidding! I only accessed the data files the other day!
How many times have you found yourself lamenting these exact words? Too many? Well, here’s something you might not know – those files that seem to have disappeared are hidden somewhere lying pretty as you struggle and cry.
But the good news is that if you use Windows 10, then it’s quite likely that you will recover them. And thanks to the tricks we’ll share below, you will be able to recover those files with ease.
These tricks will also help you find files the next time you feel that you are spending too much time looking for a specific document on your computer.
1. Use Filters
One of the best and the easiest ways for you to access files that are hidden in your computer is by using filters. While typing into the search query or the obvious ‘friendly’ advice – you could just ask Cortana work occasionally, they are frustrating.
No one wants to deal with or has the time to deal with all the random (and even mind-blowing) answers Cortana will give you; ranging from the ones in the local files to the web and every other conceivable location with information about what you are looking.
Thanks to search filters in Windows 10, you could narrow down your results significantly. In case you are wondering, the filters we are talking about are the icons right at the top of your search panel.
Besides the icons, you could also click on the down arrow button that’s at the top-right corner of the search panel. The button gives you access to all the filters on your computer. The best bit about these filters is that you won’t need to look at your nails or scroll down your Instagram feed as you wait for the results.
As long as you know exactly what you are searching for, you’ll only need to type in the filter name into the search box.
So, enter the filter name, this could be Music, Apps, Photos, Folders, Documents, Web, Settings, or Video, and after the filter name (file location) put in a full colon before you enter your search terms.
2. Quick Calculations
If you are unable to locate your calculator app, for whatever reason, you could still locate the file or find an alternative using the quick calculations options.
How does it work? Instead of searching for the calculator app, all you need to do is to input the equation into your search box (on your taskbar). Doing this gives you the right answer to your query, and on to of this, you will get an online calculator thanks to Bing.
3. Using the Settings App
While Windows 10 still has the Control Panel, it now has a new and improved feature that will make your search for the hidden files a lot easier – Settings app. Even though this setting brings about a confusing setup, it offers a lot of help in times of need.
If you are searching for a hidden file in the Setting App, you need to first click on the search box located on the taskbar – this application’s folder has a black-and-white icon. The Control Panel is the one with the colored icon.
Though these two features confuse new users, it’s important to note that the Settings app will show results from your Control Panel, on top of the results from this Settings app. Running a search for the hidden or missing file should be an effortless process thanks to the Settings app.
4. Saving Searches
What better way to ensure fast accessibility to your files than to save the files? Saving your ‘lost and found’ files might not be the first thing that crosses your mind when you search for a hidden file, but it could be what saves you time in the future.
This trick is particularly handy if you find that you are always looking for the same file all the time, day after day or week after week. To save the file, first, enter your search terms into Windows’ explorer (search box) and then click on your Search tab – it is on the ribbon running along the top of the window.
From here, you could tweak your search parameters according to file size, date, or file type, etc. Once you have the parameters set, click on the Save Search option. To ensure that you remember the file’s location, make sure that you give the search query a specific name.
When you do this, you will find your saved searches in your Searches folder, just the way the bookmarked pages are in the Bookmark Manager. Note that this option allowing you to save your searches only works when you are running your searches on the web.
5. Searching File Explorer
File Explorer is an excellent tool for locating hidden files. The File Explorer allows you to run searches from the top-right corner. It will also make it possible for you to run searches for the directory selected on the left panel/ left side of the File Explorer window.
While the results from this search may take longer than anticipated, especially when you are running a large directory, you will get results. To refine your searches from the file explorer, ensure that the File Explorer’s menu bar is expanded.
To expand, toggle your menu bar by clicking on the ^ located on the upper-right section of this window. Next, click on the View tab and then enable the Hidden Items option. For more options in the File Explorer, click on Options, then select View.
6. Control Panel
Go to your computer’s control panel then choose either the small or the large icons from the window’s view menu (if neither of the view options is selected).

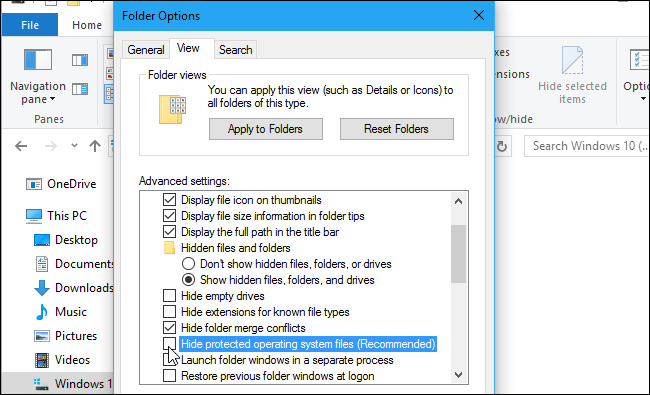
Now select the File Explorer Options (also called the Folder options) and then select to open your View tab.
In the View tab, click on Show Hidden Files, Drives, and Folders. Now uncheck the option named Hide protected Operating System Files. On the prompt that pops up, confirm your actions by selecting Yes. And then click on OK.
7. Using the Registry
The other way of accessing hidden files is by using your Windows 10 Registry.
To get started, hold down on the Windows and R keys (simultaneously) to open the Run command/ Dialog box. In the dialog box, type in Regedit and then press enter. From the window that opens, navigate to:
HKEY_CURRENT_USER > Software > Microsoft > Windows > CurrentVersion > Explorer > Advanced.
Now that you are in the Advanced section, set your value for the Hidden option to 1 (this shows hidden folders, files, and drives); and 2 for the window NOT to show the hidden folders, files or drives.
Next set your value for the ShowSuperHidden files to 1 – doing this reveals the option of showing all protected files in your operating system. You could disable this option by setting the value to 2. 2 = Don’t show the protected operating system files.
How to Access Your AppData without having to show your Hidden Files
While the steps above work great in finding hidden files and folder in your Windows 10 operating system, they might not be the best options when you are only looking for files in your AppData folder under your user account.
In such cases, you could access the file by following these steps:
Open the Run command by pressing the Windows + R keys simultaneously.
In the window that appears, type in %appdata% then click OK. These actions will open File Explorer Window. This new window will take you to a new folder, the Roaming Folder. The Roaming folder is the one for your user account’s AppData Folder in which most of the application-specific files are stored.
Using the address bar of the File Explorer, you could also access the Local folder in your AppData.
Dealing with Protected Operating System Files
Besides the use of the ‘regular’ hidden files/ folders for Windows, Microsoft will also protect your important files by adding an extra layer of protection. Knowing that the improper modification of the files could prevent your Windows system from loading, these files will be hidden behind another curtain, in an extra layer of the hidden files for extra security.
The only way of accessing such files is by unchecking the Hide protected Operating Systems Files option. You should, however, make this move with extra care – these are files you don’t want to lose.
It’s important to note that Microsoft Windows is one of the few operating systems that gives its users access to just about every area of its operating system. However, Microsoft knows better – it knows that there are files you cannot afford to lose.
Therefore, it’s put in place systems to prevent any inadvertent removal or modification of the critical system files. These files are hidden from the File Explorer’s view, which is why you will have to look for them deep in your PC.
What this means is that if you are an average Windows user, you will not be able to open the files/ folders even though they are lying in there, somewhere.
The only time you might access these files, albeit accidentally, is if you run specific troubleshooting efforts which need temporary access to the hidden files. Windows works on and prefers keeping these files hidden.
Therefore, by disabling the Hidden options for protected files, you choose to risk exposure and even possible loss or damage of your system’s critical files. The loss or modification of these data files often results in the irreversible damage of the Windows operating system.
An example of these hidden files is the AppData file which is in your Users folder in Local Disk C – you will only see the folder under This PC > C: > Users > [Your User Account], but you cannot find it in your File Explorer window.
Tips for File Management in Windows 10
- Take advantage of the Custom Quick Access View – you could add or remove folders to this section. You could also Pin files/ folders to the Quick Access application
- Turning the ribbon On and Off – you could customize this option in the File Explorer window.
- Showing and Hiding File Extensions – You could turn the file extensions On or Off with ease by clicking on your View tab located at the top of your display in the View ribbon. Here, one of the extensions that you find is the File Name Extension. Now click on that box next to the file, and this will enable the check mark, revealing the extensions. Unchecking it will hide the extensions.
- Launch the File Explorer using the This PC option, instead of the Quick Access window. To do this, go to File Explorer and click on Options under the View menu. Go to Open File Explorer under the Folder Options, and then select the pull-down menu from the settings – this allows the change from Quick Access to This PC.